Skip to content
View Categories

Add Yourself as a Client

In this article:

Setting yourself up as a client (and contact) allows you to switch between firm view and client portal view with ease. If you need to check what forms will look like, you can send one to yourself and view it with the click of a button. You will be better able to help your clients if you are familiar with what the Client Portal area looks like.

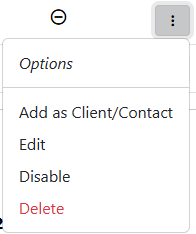
All you need to do is go to Settings > Users and select the “Add as Client/Contact” button from the user’s menu. then log out and back in again.

Tip: This as a part of your recommended steps when setting up your Seamlss account.

Keep reading for a step-by-step guide of this process.

Step-by-Step Guide #

Go the Settings page, and then click on the Users tab. For any user you want to create a client for, click on the right options menu and select “Add as Client/Contact“.

If you don’t see the option, this user is already a client.

Once added, you will see a confirmation message and a new “client” icon next to the user.

Admin list: Big Boss with a highlighted client icon, email bigboss@example.com, phone 0400 111 222, added 10 Aug 2026, status Active, 2FA off; yellow 'Client icon' label present; toast in bottom-right reads 'Client contact added.'

For the ability to take affect, you will then need to log out and then log back in. Now upon logging in you will be asked if you would like to go to your Dashboard or your Client Portal area.

Once on your Dashboard, a button will appear next to the Seamlss logo to allow you to switch between the Client Portal area and your dashboard.

Clicking the button with the symbol of a person will take you straight to the Client Portal area. To return to the dashboard, click on the button next to your firm’s logo at the top of the page.