- Email Options
- Stacking Fetch Forms
- Creating a new form
- Text fields - Single line
- Text fields - Large
- Option fields - Checkbox
- Option fields - Radio
- Option fields - Select field
- Special fields - File upload
- Special fields - Multiple file upload
- Special fields - Email address
- Special fields - Date
- Display fields - Heading
- Display fields - Plain text description
- Display fields - Hyperlink
- Finalising Fetch Form
Fetch requests are a quick, easy, and secure method for requesting additional information from clients. By keeping all communication on Seamlss and off email, you are protecting yourself and your clients from potential data leaks.
Open the Clients menu from the left, select a client, and click the blue + New Request button (see below).

Then select + Quick Fetch Request

Select a template by going to the drop-down menu.

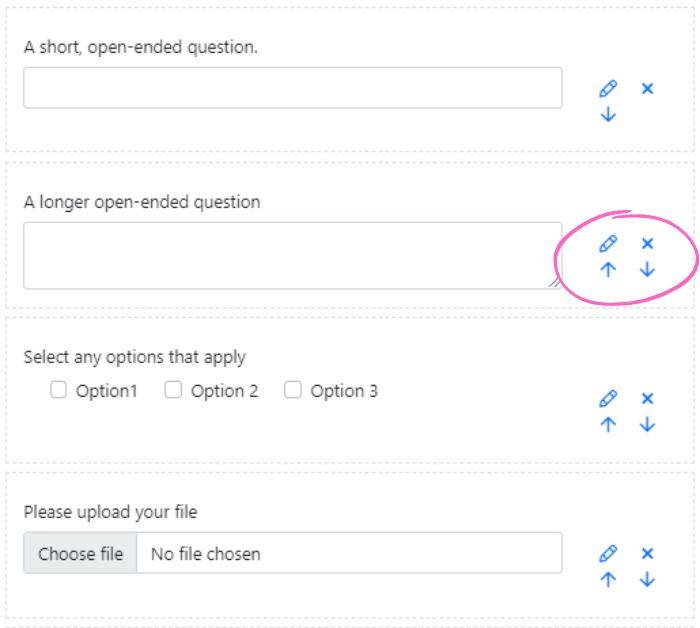
You can edit the form on the fly to customise it to the need of your client by using the icons on the right-hand side of each question. Select the pencil to edit, the X to delete, or the up/down arrows to reorder.

Email Options #
At the bottom of the Fetch form, you can choose whether to send the client a request via email. If you untick the box it will not send, however you may choose to resend it later from the client window.
If you choose to send an email request, you can also add a custom message for the client.

When you are ready to send the form to your client, click Send Fetch. A window will pop up confirming the Fetch has been sent.

Stacking Fetch Forms #
To learn how to send multiple fetch forms in one bundle, read our help guide on Stacking Fetch Forms here.
Creating a new form #
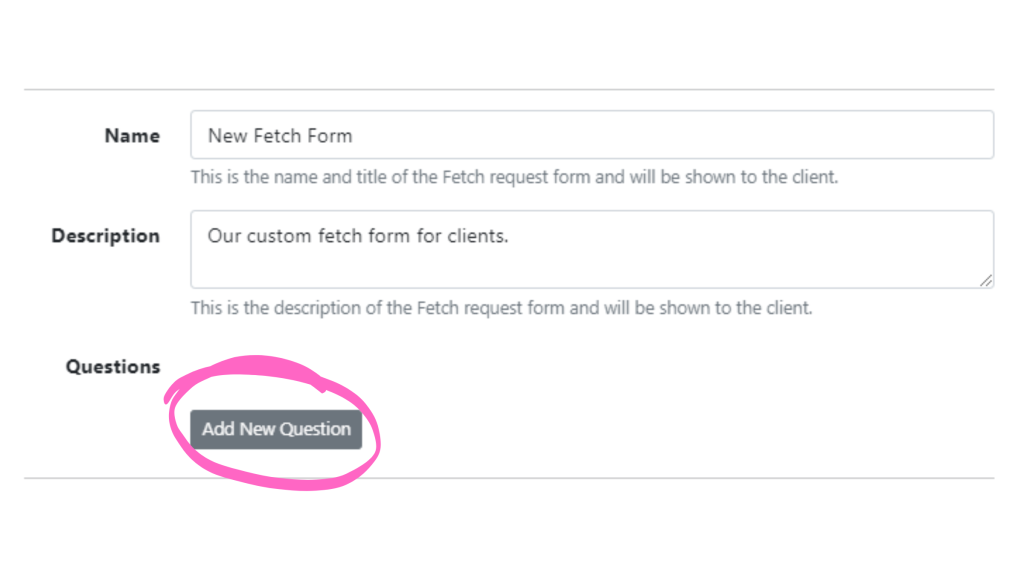
To create a new form, simply fill out the Name and Description boxes, then hit Add New Question.

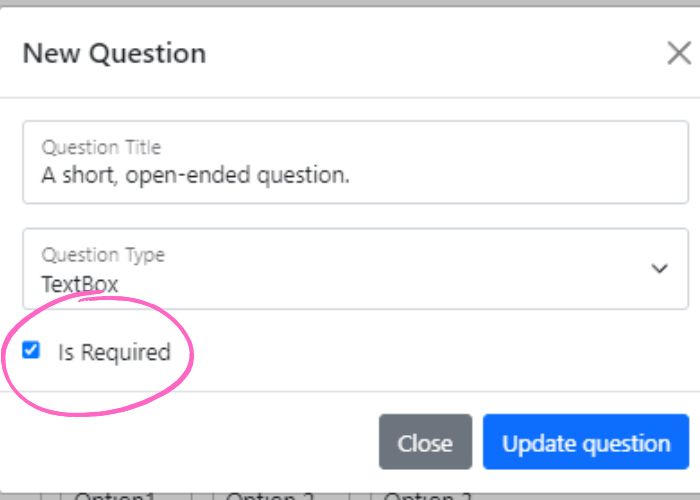
Under Question Type, you can select the type of question from the drop-down menu.
Forms created in this way will not be saved as templates. View our help guide on creating templates if you would like to create a new form you can save and use again.

For each question type, you can select whether the question is mandatory or not.
If the question is optional, untick the box.

Jump to each question type using the links below.
- Text fields- Single line
- Text fields – Large
- Option fields – Checkbox
- Option fields – Radio
- Option fields – Select field
- Special fields – File upload
- Special fields – Multiple file upload
- Special fields – Email address
- Special fields – Date
- Display fields – Heading
- Display fields – Plain text description
- Display fields – Hyperlink
Text fields – Single line #

Text fields allow you to ask your client an open-ended question that only requires a short answer. The client can type whatever they would like in response, but there is limited space.

Text fields – Large #

If you need more space for the client to write a long answer, use the large text field.

Option fields – Checkbox #

With Checkbox, clients may select as many boxes as apply from a list of specified options.
Type your first option into Field Options then click Add option. You can add as many options as you need.


Option fields – Radio #

Create your options as explained in the Checkbox section.
This question type allows clients to select ONE option from a range of checkboxes.

Option fields – Select field #

Create your options as explained in the Checkbox section.
This question type creates a drop-down menu for clients to select from. They can choose one option only.

Special fields – File upload #

If you need a client to send a document, they can upload it by choosing a file. This option will only allow the client to upload a single document. To allow them to select several files, use Multiple file upload.

Special fields – Multiple file upload #

Use Multiple file upload if you would like the client to be able to upload multiple documents for one question.

Special fields – Email address #

Use this question type if you need a client to provide you with their email address.

Special fields – Date #


This question type allows you to ask a client to specify a date. They can respond by typing in the date or choosing from the calendar in the drop-down window.
Display fields – Heading #

If you need to add a heading to your form you can do that by selecting Heading in Question Type.
Type your heading in Question Title, then go to the Heading Type drop-down menu to select the size of your heading.

Display fields – Plain text description #
Plain text description allows you to add other text that doesn’t require a response, for example to give further information.

Display fields – Hyperlink #
If you want to add a link to your form, select Hyperlink.


Paste the URL address into the Link box, and write a name for the link in Link Text (this text will be on the form instead of the link itself).
You can also select whether or not you would like the link to automatically open in another tab.

The link will appear as blue underlined text with a link icon next to it

Finalising Fetch Form #
You can edit, delete, or reorder your questions using the buttons to the right-hand side of each question.
Select the pencil to edit, the X to delete, or the up/down arrows to reorder.


