
Zapier connects Seamlss to the other apps your firm uses. The most common Zap sends a client their Seamlss request automatically.
Someone books a meeting, signs a proposal or is added to a spreadsheet, and Seamlss emails them the onboarding or re-engagement request you set up in a link.
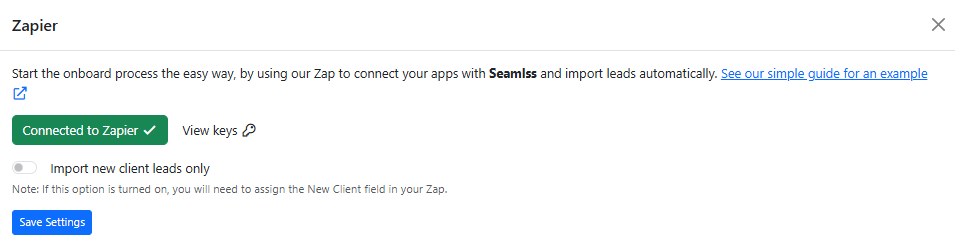
In Seamlss: Settings, the Integrations tab, then Configure on the Zapier card.
Open IntegrationsConnect Zapier #
Make your keys in Seamlss
Open the Zapier card and click Connect to Zapier. Seamlss makes an API Key and an Organisation Key. Click View keys to see and copy them. Treat them like passwords.
Paste them into Zapier
The first time you add a Seamlss step to a Zap, Zapier asks for both keys. Paste them in and save. Zapier remembers the connection for your other Zaps.
Send a client a request from a Zap #
Make the link in Seamlss
Create a Client Link with what the client should do: ID check, forms, tax return details, engagement letter. For a new enquiry, make a Lead Link instead, under Leads, Links.
Copy the link code
The code is the end of the link’s web address, everything after /link/. Zapier uses it to know which request to send.
Start the Zap
In Zapier, choose the app and event that should send the request, such as a new booking in Calendly, a new row in a Google Sheet or a signed proposal.
Choose Send Smart Link
Add a Seamlss step and choose Send Smart Link. Paste the link code.
Match the client’s details
Map first name, last name, email and mobile from your app. Make sure that app asks for all four, for example as booking questions.
Test it, then publish
Zapier’s test sends the real email, so test with your own details first. Seamlss emails the person the request from your link. If nobody with that email is in Seamlss yet, it adds them as a new client, or a new lead for a Lead Link.

One email per person. Seamlss finds people by email, so two people sharing an address get mixed up. Each person needs their own email and mobile explains why.
Watch Clayton build a booking Zap and a spreadsheet Zap in our end of financial year webinar.
Send requests in bulk #
Put one client per row in a Google Sheet: first name, last name, email and mobile, plus a column that starts the Zap, so each row is sent once. Point the Send Smart Link step at those columns and turn the Zap on. When the batch has gone, turn the Zap off so nothing is sent twice.
Send leads in from another app #
To add new enquiries without sending them anything, choose Add Lead as the Seamlss step and map the person’s name, email and mobile. Zapier lists Add Client as deprecated, so use Add Lead for new Zaps.
Leads go to Leads in the left menu, with Zapier as the source. Turn on Lead Added in Settings, Notifications to get an email for each one.
Only want new clients? Turn on Import new client leads only and save. Seamlss then adds a lead only when your Zap sends the New Client field as yes.
Start a Zap from Seamlss #
These Seamlss events can start a Zap, for example to add a task in your practice software. Each sends the person’s contact details (Seamlss on Zapier, 11 November 2026).
| Event | When it fires |
|---|---|
| Client Onboarded | A client is onboarded |
| Client Verified | A client’s identity is verified |
| Lead Created | A lead is created |
| Lead Request Created | A lead finishes a request |
| Client Request Completed | A client finishes a request |
Something not working? #
Send Smart Link fails
Check the link code is copied exactly, with nothing before it, and that the link is Active in Seamlss. A switched off link can’t be sent.
The wrong person got the request
Two people share an email address. Give each person their own, then send again.
Zapier won’t accept the keys
Copy both again from View keys. If someone clicked Generate new API keys, the old keys stopped working, and every Zap needs to sign in again with the new ones.
Zapier’s test says it did not add the lead
Import new client leads only is on and the Zap didn’t send New Client as yes. Map that field, or turn the switch off.
A Zap stopped connecting
In Zapier, remove the Seamlss connection from your connected apps, then connect again with your keys.
Still stuck? Contact support and tell us what you see.


